Set up SSH

First, set up SSH by running the following in the tcsh session.

1
2
3
4
echo 'sshd_enable="YES"' >> /etc/rc.conf
echo 'ListenAddress 0.0.0.0' >> /etc/ssh/sshd_config
echo 'PermitRootLogin yes' >> /etc/ssh/sshd_config
echo 'PasswordAuthentication yes' >> /etc/ssh/sshd_config

Create a host RSA key with ssh-keygen -t rsa and entering /etc/ssh/ssh_host_rsa_key as the directory. Do not worry about a passphrase. After this is done, start the SSHd service with service sshd start.

Note: This isn’t the most secure as you are logging in as root.

Reset the root password with passwd.

Install packages and dependencies

Install the latest pkg package with pkg bootstrap -f. After this has installed, upgrade with pkg2ng. Next, install the packages:

1
2
pkg install xorg openbox tightvnc linuxdcpp
pkg install libiconv expat

For some reason Pango needs to be reinstalled, so reinstall with:

1
pkg install -f pango

Set up VNC

Create a directory for the xstartup script and then edit the file.

1
2
mkdir ~/.vnc
edit ~/.vnc/xstartup

Place the following in the xstartup script and save:

1
2
3
4
#!/bin/sh
xrdb $HOME/.Xresources &
openbox &
xterm -bg black -fg gray &

Make the script executable:

1
chmod +x ~/.vnc/xstartup

Get rid of setup quirks

There are certain things that linuxdcpp doesn’t like, so run the following commands:

1
2
gdk-pixbuf-query-loaders > /usr/local/lib/gdk-pixbuf-2.0/2.10.0/loaders.cache
mkdir -p /root/.local/share

Run VNC

Run the following to start VNC

1
vncserver -depth 24 -geometry 1280x800 -nolisten tcp :1

You will be asked to set a password - this is your VNC password for later.
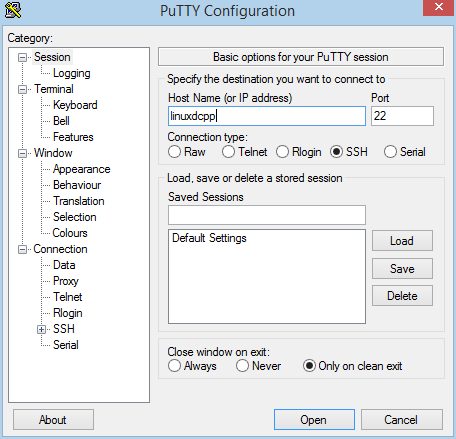
Setting up PuTTY

Download PuTTY and run. Enter your host details.

host.png

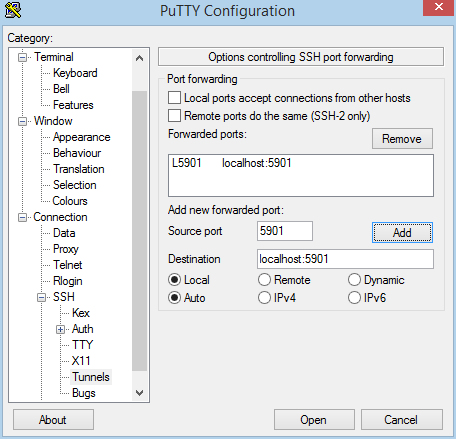
Go to Connection > SSH > Tunnels and create a tunnel on port 5901 for VNC. Don’t forget to press “Add”

tunnel.png

Press “Open” to connect. Enter root for the username and then type the password you specified earlier with passwd.

Now, download and install TightVNC and open the viewer. Connect to localhost:5901. Type the VNC password and press enter. You will now be connected to a remote desktop.

Open LinuxDC++ with linuxdcpp.

Done!

Comment and share

I ran in to an issue where SickRage wasn’t downloading torrents due to a Unicode decode failure. The error I was getting:

1
2
3
4
5
2015-01-17 14:57:12 WARNING SEARCHQUEUE-MANUAL-272644 :: Failed to download result
AA
AAUnicodeEncodeError: 'ascii' codec can't encode characters in position 56-57: ordinal not in range(128)
AA with open(filename, 'wb') as fp:
AA File "/usr/pbi/sickrage-amd64/share/sickrage/SickRage/sickbeard/helpers.py", line 1209, in download_file

To fix this, I ssh’ed in to the jail and ran edit /usr/local/etc/rc.d/sickrage. After the line load_rc_config ${name}, I pasted the following lines:

1
2
3
export LC_ALL=en_US.UTF-8
export LANG=en_US.UTF-8
export LANGUAGE=en_US.UTF-8

After saving the file and restarting the sickrage service, everything worked again.

Comment and share

I’ve been running a little short on storage space lately, so I decided to take the plunge and order a new storage system. Previously I was using a Synology DS413 with four 3TB Hitachi disks and I was hoping to get a Synology again for my new system, however once you want a Synology unit with more than four bays the price goes up quite significantly.

After a lot of research and reviewing of similar builds, I ended up with the following components.

Component List

  • Case - Fractal Design Node 304

    This case fits six drives, a Mini-ITX motherboard and a standard ATX power supply. Cable management is quite difficult however the entire case is less than 20L in size which is only marginally larger than my existing Synology unit.

  • Motherboard - ASRock E3C224D2I

    Unfortunately there isn’t much choice when it comes to server-grade Mini-ITX motherboards, however this one fits the specifications quite nicely. It has six SATA ports (2 x SATA2, 4 x SATA3), two ECC DDR3 slots, a BMC chip and two Intel GBe ports. The other option was an Atom Avoton C2550 motherboard however I wasn’t too keen on a non-upgradable CPU and using a Marvell storage controller over an Intel one.

  • CPU - Intel Core i3-4160

    Surprisingly, the Core i3 supports ECC RAM! I was originally going to get the Core i3-4150 however this model was on sale and ended up being cheaper.

  • Memory - Kingston KVR13E9K2/16I

    After reading lots of stories of incompatible memory, I decided to go with RAM sticks that somebody else had tested.

  • Power Supply - Corsair CX600M Modular

    80+ Bronze certified and six SATA power connectors. I would have rathered an 80+ Gold certified power supply but the price difference was too great.

  • OS Disk - SanDisk Cruzer Fit 16GB

    A nice and small USB key that can be installed directly on to the motherboard.

  • Storage Disks - 6 x Western Digital Red 6TB WD60EFRX

    Originally I was going to order Western Digital Green 6TB WDEZRX drives and run WDIDLE3 on them to fix the LCC issue, however I found that the two models were fairly close in price and the Reds have a longer warranty.

  • OS - FreeNAS

    For the OS, I chose FreeNAS after reading a lot about ZFS. The drives are configured in a RAID-Z2 configuration (similar to RAID6) which can tolerate two disk failures. This gives me 36TB of raw storage and 21.8TB of usable storage.

IMG_20150115_173137.jpg IMG_20150115_173213.jpg IMG_20150115_173253.jpg IMG_20150115_173336.jpg IMG_20150115_173413.jpg

Performance

To test performance, I had two panes open in tmux and ran one command in each window:

  • Pane 1: iozone -a -s 24g -r 4096 -+w 1 -+y 1 -+C 1
  • Pane 2: zpool iostat 1

Watching the zpool iostat output whilst iozone was running, I saw that my maximum read speed was around 550-600 MB/s and my maximum write speed was around 300-350 MB/s.

Thoughts

The next upgrade will be 10gbit networking, however this is a long way off and not really needed at the moment. With a switch upgrade I will be able to use teaming but there is generally only one client accessing the server at once which negates this.

Comment and share

  • page 1 of 1

Jacob Ludriks

author.bio


author.job